Streaming WebM to display in browser with HTML5 is currently quite problematic - none of the well-known streaming servers support WebM at the moment. Current popular options are either Java-based stream-m and experimental 2.4-beta release of Icecast.
Lesser known option is to use FFmpegs FFserver to stream WebM video. For this to work you need a decently current FFmpeg release (this article was written using stable 1.0 release) compiled with libvpx and ffserver support. New builds for FFmpeg are available for Windows and Linux, however ffserver is available only on Linux.
1. Configuring FFserver
FFserver will be the deamon doing the actual delivery to client computers. It will need enough available outbound bandwidth to deliver video to all connected clients. Video stream encoding will be done by FFmpeg so machine running FFserver won't need alot of CPU power.
Sample ffserver.conf file for WebM streaming:
Port 8090                      # Port to bind the server to
BindAddress 0.0.0.0
MaxHTTPConnections 2000
MaxClients 1000
MaxBandwidth 10000             # Maximum bandwidth per client
                               # set this high enough to exceed stream bitrate
CustomLog -
NoDaemon                       # Remove this if you want FFserver to daemonize after start

<Feed feed1.ffm>               # This is the input feed where FFmpeg will send
   File ./feed1.ffm            # video stream.
   FileMaxSize 1G              # Maximum file size for buffering video
   ACL allow 127.0.0.1         # Allowed IPs
</Feed>

<Stream test.webm>       		# Output stream URL definition
   Feed feed1.ffm              # Feed from which to receive video
   Format webm

   # Audio settings
   AudioCodec vorbis
   AudioBitRate 64             # Audio bitrate

   # Video settings
   VideoCodec libvpx
   VideoSize 720x576           # Video resolution
   VideoFrameRate 25           # Video FPS
   AVOptionVideo flags +global_header  # Parameters passed to encoder
                                       # (same as ffmpeg command-line parameters)
   AVOptionVideo cpu-used 0
   AVOptionVideo qmin 10
   AVOptionVideo qmax 42
   AVOptionVideo quality good
   AVOptionAudio flags +global_header
   PreRoll 15
   StartSendOnKey
   VideoBitRate 400            # Video bitrate
</Stream>

<Stream status.html>     		# Server status URL
   Format status
   # Only allow local people to get the status
   ACL allow localhost
   ACL allow 192.168.0.0 192.168.255.255
</Stream>

<Redirect index.html>    # Just an URL redirect for index
   # Redirect index.html to the appropriate site
   URL http://www.ffmpeg.org/
</Redirect>
By default ffserver will look for /etc/ffserver.conf config file. You can override that with -f switch.
After starting ffserver with ffserver -f ffserver.conf you should see ffserver start up:
ffserver version 1.0 Copyright (c) 2000-2012 the FFmpeg developers
  built on Oct 12 2012 21:59:40 with gcc 4.7 (Ubuntu/Linaro 4.7.2-2ubuntu1)
  configuration: --enable-gpl --enable-libfaac --enable-libfdk-aac --enable-libmp3lame --enable-libopencore-amrnb --enable-libopencore-amrwb --enable-librtmp --enable-libtheora --enable-libvorbis --enable-libvpx --enable-x11grab --enable-libx264 --enable-nonfree --enable-version3
  libavutil      51. 73.101 / 51. 73.101
  libavcodec     54. 59.100 / 54. 59.100
  libavformat    54. 29.104 / 54. 29.104
  libavdevice    54.  2.101 / 54.  2.101
  libavfilter     3. 17.100 /  3. 17.100
  libswscale      2.  1.101 /  2.  1.101
  libswresample   0. 15.100 /  0. 15.100
  libpostproc    52.  0.100 / 52.  0.100
Fri Nov  2 16:59:16 2012 FFserver started.
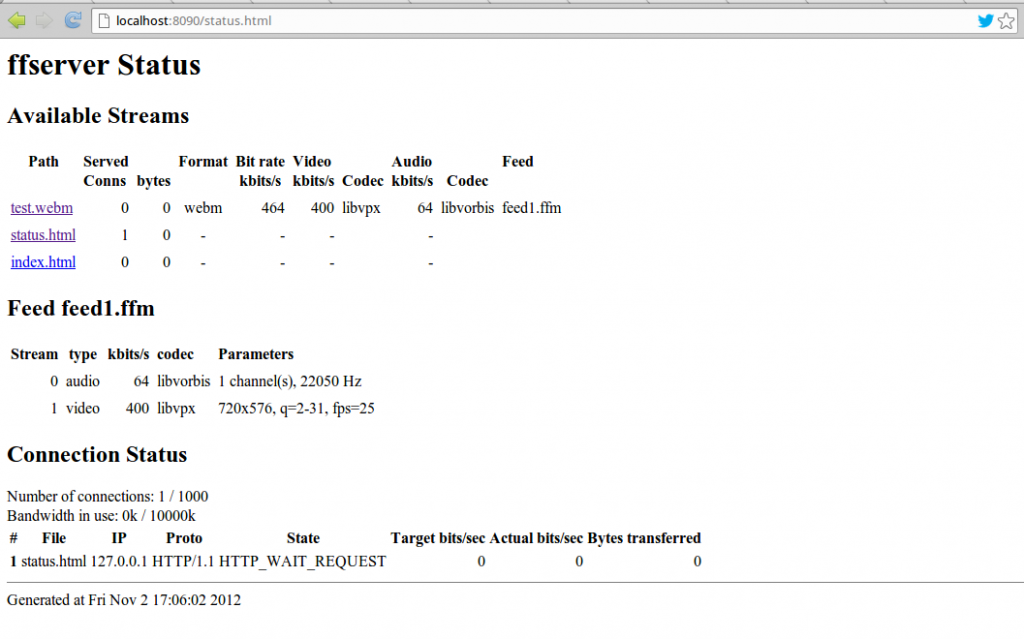
Opening the status page on http://localhost:8090/status.html should now show configured server status.
2. Streaming to FFserver with FFmpeg
After FFserver is running you can stream to it by specifying feed FFM url as an output.
Important: You SHOULD NOT specify any encoding settings, those will be retrieved from FFserver!
Example of streaming webcam (or any other V4L2 cam) input with PulseAudio microphone audio on Linux:
ffmpeg -f video4linux2 -s 640x480 -r 25 -i /dev/video0 -f alsa -i pulse http://localhost:8090/feed1.ffm
or screencasting your desktop with x11grab:
ffmpeg -f x11grab -r 25 -s 1280x800 -i :0.0 -f alsa -i pulse http://localhost:8090/feed1.ffm
Opening http://localhost:8090/test.webm in a compatible browser (Firefox, Chrome) should now result in your streamed video playing.
Small tips about streaming video with FFmpeg
Linux
To get webcam capabilities you can use -list_formats all input command:
ffmpeg -f video4linux2 -list_formats all -i /dev/video0
Afterwards you can configure resolution with -s, framerate with -r and codec with -codec:v. Just make sure to keep those parameters AFTER -f video4linux2 and BEFORE -i. If you put them after the -i input specifier they will apply as encoding settings.
Windows
In Windows you need to use DirectShow dshow input format to grab video from a camera (or a capture device like Blackmagic boxes).
Example of streaming video from Windows webcam:
ffmpeg -f dshow -i video="USB2.0_Camera":audio="Microphone (USB Audio Device)" http://localhost:8090/feed1.ffm
To get list of device names for devices available on your systems you can pass -list_devices true to ffmpeg
ffmpeg -f dshow -list_devices true -i dummy
and to get list of camera capabilities you can pass -list_options true
ffmpeg -f dshow -list_optione true -i dummy
The options can be passed in the same way as noted above.